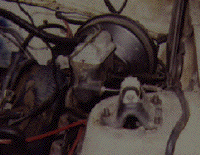
This
is a shot of my Maverick with the booster installed. It's really
a tight fit.
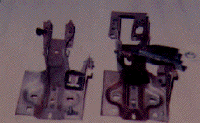
This
shows the difference between a non booster pedal/steering column
mount on the left and one designed for a booster on the right.
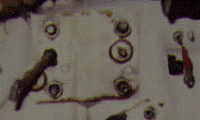
This
is the mount that is installed on the inside of the firewall. Non
booster Mavericks do not have this. Note:
On Wylie's 72 Maverick it did have the proper mount. You
may also notice that the "plunger" comes out in a different
place that the booster less Maverick. The original hole sits under
the middle of this plate. |
The
following info is partially from a email sent to me from a fellow
Maverick Owner. I followed this same procedure and had no problems.
The power booster setup from a 1975 or later Maverick has the proper
angle to clear the shock tower. Granada also have the similar parts
as the Maverick. They are almost the same car and is a good place
to find these same parts. Except for stuff like brake lines. The
easiest way that I have found to do the whole swap is to get the
following parts from the donor car:
- The
power booster/master cylinder assy
- The
shock tower to firewall support
- The
proportioning valve with brake lines
- The
pedal assembly from under the dash (Including brace).
This is the "power" aspect of the whole job. The manual
brake pedal mount will not work.
I have found that the spindles from a 1974 manual disc brake Maverick
are a direct bolt-in. Simply undo the old ball joints, tie rod
ends and rubber brake hoses, and bolt them right in place of the
drum spindles.
Installation
of the booster and pedal: (This is for a Maverick/Comet with manual
drum on all four corners.)
- Unbolt
the stock 2 bolt master cylinder, prop. valve, and any attached
lines that will be in the way.
- Undo
the under dash tray or glove box panel from inside the car.
- Remove
the two 9/16" nuts that hold the plastic cover on the bottom
of the column at the dashboard.
- There
will be two more exposed 9/16" bolts that will need to
be removed. The column should be hanging free. The purpose of
all of this is to get to the bolts that hold the pedal and the
inner brace up under the dash.
- Get
all of the bolts out of the brace and remove it with the pedal.
Modification
to recipient car:
Note
from Wylie: Take out the front seat to save your back
and neck from unneeded strain.
- You
will need to make a paper or cardboard template from the back
of the booster. There should be four mounting holes for the
booster and one egg-shaped hole for the rod that actuates the
brakes. (An easy way is to study the firewall on the donor car
to get an idea of the holes that will need to be drilled). Note
from Wylie: The problem with the original bracket is
that the bolt pattern is slightly different. The vertical distance
between the bolt holes is about 1/4 inch shorter on the bracket
than on the brake booster. First, I removed the old brake pedal
assembly and the spacer bracket. I removed the 4 spacers from
the bracket that mounts between the firewall and the pedal assembly
by using a drill to destroy the tack welds in the 1/8 piece
of sheet metal. (Each spacer is tack welded to the bracket by
three spot welds. These welds make little dimples that keep
a drill bit from "walking") if you place a 3/8 drill bit in
the center of a dimple and just drill about 1/8 of an inch,
it will effectively remove the weld and the spacer will literally
fall off the bracket when you drill the last weld. (This works
much better that using a hammer in my opinion but "to each his
own") Next I moved the two bottom holes down about 1/4-1/2 inch
where the original master cylinder bolts went through the firewall.
(I just "eyeballed" it but I'm sure a cardboard template would
work much better). Now all the bolt holes are in place.
- From
here, you can do one of two things: 1) You can
create a cardboard template for the new hole where the shaft
passes through the firewall OR 2) You can remove
the bracket that is between the booster and the firewall and
put it in place. Hold it there and score a line using a nail
or some sharp object where the new hole is to be drilled. Home
depot sells hole cutting bits that are excellent for this job.
I spent $15-20 on a 1&1/8 in hole saw and center bit. The ones
I got were black in a green box and cost about 8 dollars for
each part of the 2 piece tool. (Hence $15-20). The electric
drill I have is too long to fit between the shock-tower and
the firewall when the bit is inserted. I have a pneumatic drill
that is about 2 inches shorter and it worked/fit beautifully.
- To
mount the prop. Valve, the two mounting holes may have to be
enlarged, depending on the car.
- From
Wylie: The tricky part is that the spacers are now all
separate instead of being part of a bracket. The spacers are
ABSOLUTELY NEEDED for everything to work right. The pedal assembly
is not meant to reach all the way to the firewall when its attached
to the steering column. There is a gap between the pedal assembly
and the firewall (its supposed to be there). Have someone insert
the brake booster bolts through the firewall so only 1/2 inch
of each of the bolt comes through into the passenger compartment.
Place a spacer on each of the bolts and then line up the pedal
assembly (I LOOSELY attached the pedal to the steering column
so it is able to wiggle back and forth which makes this easier)
now have your assistant SLOWLY wiggle the bolts through the
pedal assembly holes. (Be sure that you do this slowly so none
of the spacers fall off because this is the most difficult part)
Once you have 1/4-1/2 inch of the 4 bolts through the pedal
assembly place the nuts on them so it doesn't back out when
your assistant lets go off the booster.
-
Now figure what brake lines will have to be bent, shortened,
etc..
- I
used a tubing cutter and a double flaring tool that I borrowed
from a friend. PAY ATTENTION TO WHERE THE LINES CAME OFF OF
THE DONOR CAR. You will need to know which lines off the master
cyl. Go to which holes in the prop. Valve, and to which wheel
they go from there.
All
in all, it is a relatively easy swap that is well worth the time
involved, especially if you plan to hotrod the engine in your
car.
|